How to Install Faced Fiberglass Insulation?
Installing faced fiberglass insulation seems simple, but many people get it wrong and waste time, energy, and money.
The correct way to install faced fiberglass insulation is by placing the vapor barrier (facing) toward the conditioned space and fitting the batts snugly between framing. Secure the facing using staples or manufacturer guidance, ensuring there are no gaps or compression.

Doing the job right will help you save energy, avoid mold, and meet building codes. But understanding the details can get complicated, especially when you face conflicting advice. I’ll break down each part of the process to help you avoid common mistakes and get better results.
What is the correct way to install faced insulation?
Many people install faced insulation backwards, or cut it too short, and end up with poor performance and wasted money.
The correct way to install faced insulation is with the paper (faced) side facing toward the inside of the room—the conditioned space. This helps control moisture and improves energy efficiency.
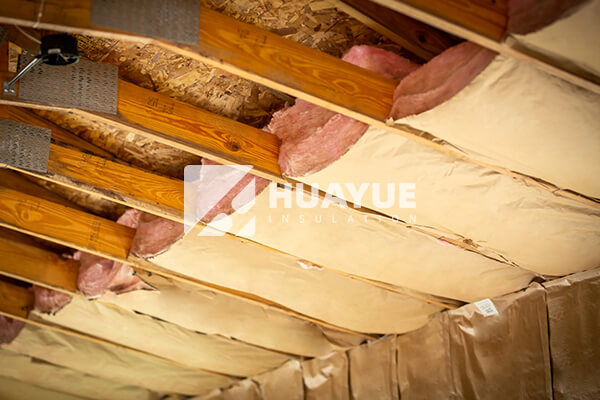
When I install faced fiberglass insulation, I make sure to measure the cavity first. I then cut the batts so they fit snugly, without gaps or bunching. If I compress the insulation, I lose its R-value, and the room feels colder later. I always put the faced side toward the living space—this is the side I want to keep warm and dry. If I’m insulating an exterior wall, attic, or basement, the facing always goes toward the heated or cooled area, not the outside or unconditioned side.
Below is a summary table to help:
| Step | What to Do | Why It Matters |
|---|---|---|
| Measure cavity | Ensure snug fit | Prevents gaps and heat loss |
| Facing direction | Toward conditioned space | Vapor barrier keeps moisture out |
| Avoid compression | Let insulation fill cavity fully | Maintains proper R-value |
| Cover joints | Overlap facing at seams by 1 inch | Moisture control, air seal |
If you skip these steps, your insulation might not work well, and you may end up with condensation or cold spots in your rooms.
Does faced insulation need to be stapled?
Stapling insulation sounds simple, but skipping it or overdoing it can make things worse instead of better.
Faced fiberglass insulation should be stapled in place using the paper flanges, but not too tightly. Stapling helps keep the insulation from falling out and keeps the facing flat to form a vapor barrier.
When I staple insulation, I use the flanges on the facing—these are the paper or foil “wings” along the edge. I can staple the flanges to the framing, either facing inward (over the stud face) or outward (onto the edges of the studs). Both methods work. The key is not to pull too hard on the paper. If I stretch the facing or staple it every inch, I risk tearing it or creating gaps, which breaks the vapor barrier. I usually space staples about every 8 to 12 inches.
Here is a quick table to guide correct stapling:
| Item | Best Practice | What to Avoid |
|---|---|---|
| Staple spacing | Every 8–12 inches | Too few or too many staples |
| Flange location | Over or onto stud face | Skipping flanges |
| Staple tightness | Secure, not stretched | Tearing paper |
| Overlapping joints | 1-inch overlap with staple seam | Big gaps at seams |
If I don’t staple properly, the insulation may sag, fall, or let moist air slip past the facing, causing mold or cold drafts.
Which side does faced insulation go on?
This step seems basic, but I have seen many jobs where the paper faces the wrong way and homeowners run into big problems.
Faced insulation always goes with the vapor barrier (the paper side) facing toward the living area—the space that will be heated or cooled. This blocks moisture from getting into the wall or ceiling.
In homes, the conditioned space is wherever people will be comfortable—inside living rooms, bedrooms, or an office. If I am insulating a wall between a home and an unheated garage, the paper faces the home. For attic floors, the facing is down toward the rooms below. Sometimes, in humid climates or in special situations, the right direction can change, but most times, I point the facing at the space I want to keep dry.
Here’s a quick reference table for common spaces:
| Location | Facing Direction | Why? |
|---|---|---|
| Exterior wall (outside cold) | Toward interior | Keep inside warm, stop moisture |
| Attic floor | Down, toward room | Protect rooms below |
| Basement ceiling | Up, facing living | Stop moist air from entering floor |
| Between home and garage | Toward home | Keep living space dry and warm |
If you point the facing the wrong direction, you let moist air condense inside the wall, which can ruin wood, paint, and insulation itself.
When should you not use faced insulation?
It sounds safe to always use faced insulation, but in some cases, it can actually cause problems.
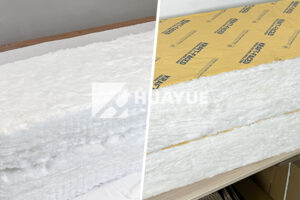
You should not use faced insulation in cavities that already have a vapor barrier or where two vapor barriers may trap moisture between them. This can lead to dangerous mold and rot.
Faced insulation is best when you are adding it to an unfinished wall, ceiling, or attic floor. But if a wall already has a vapor barrier—like a plastic sheet, foil, or foam—you don’t want to double up. I learned that trapping moisture between two barriers causes it to build up, especially in basements or bathrooms. Instead, use unfaced insulation in those locations so the space can dry out. Local codes may also guide which type to use. If in doubt, I consult a local expert or inspector.
Compare where you should and shouldn’t use faced insulation:
| When To Use | When Not To Use |
|---|---|
| Unfinished exterior walls | Walls with existing vapor barriers |
| Attic floors/ceilings | Over old insulation with facing |
| Between conditioned and unconditioned spaces | Basements with plastic vapor barrier |
Knowing when not to use faced insulation is just as important as knowing how to use it. If used the wrong way, faced insulation can make your home less safe and comfortable.
Conclusion
By using faced insulation correctly—right side, proper stapling, and in the right places—you keep your space warmer and safer for years.
You may also be interested in:

Ready to Get Started?
Get in touch with our experts for personalized solutions tailored to your needs.
Get Free QuoteLatest Articles

What is R19 Kraft Fiberglass Insulation Batt?
Mar 20, 2026

What is High Density Mineral Wool?
Mar 20, 2026
Is Glass Wool the Best Choice for Sound Insulation?
Mar 19, 2026
Let's Work Together
Ready to take your business to the next level? Get in touch with our team of experts and let's discuss how we can help you achieve your goals.
Get Free Solutions